Hear your copy with Text to Speech
If you work on your own, as I do, it’s easy to fall into the trap of treating your writing as, well, just writing. You type it in Word, read it through on paper and send it off without it ever being articulated out loud. In the process, it’s easy to neglect the sound, rhythm and overall flow of your words.
Since neuroscientists have found that people ‘hear’ the words they read internally, this isn’t ideal. You’re neglecting a major part of your writing’s sensory appeal. And it’s even worse if your writing is actually destined to be spoken out loud in a broadcast ad, video voiceover or similar medium.
Reading and recording
One simple remedy for this is to read your text out loud. But the problem is that you’re then reading and speaking the words at the same time, which nobody in your audience will ever do. You want to replicate the experience of either actively reading (which is easy) or passively listening.
How about recording your voice? That’s certainly an idea, but in my experience, hearing your own voice is incredibly distracting. Even after more than 200 phone interviews, I still wince when I hear my provincial quack on the recording. It’s hard to do ‘is this copy OK?’ if you can’t get past ‘do I really sound like that?’
Text to Speech
The solution I’ve found uses a feature that, until recently, I’d completely ignored: Text to Speech. Incredibly, speech synthesis has been part of Mac OS since 1984, but it’s only really been of interest to those who need it for accessibility. However, the ‘Whisper’ voice did drop some guest vox for Air on 10,000Hz Legend:
Things have improved in recent years, and Apple’s ‘Alex’ voice, introduced with OS X 10.5, does a pretty good job of sounding like a person. (OK, a person impersonating a computer.)
Once Text to Speech is set up, you can have Alex read back any text you select on screen with a single keypress, allowing you to check the sound of your writing as you go along. I’ve started using this for nearly every short piece of writing I do, and always for anything that will be spoken out loud.
Setting up Text to Speech
These instructions are for Mac OS X 10.7. Earlier systems are similar as far as I know. If you’re on PC, go and buy a Mac.
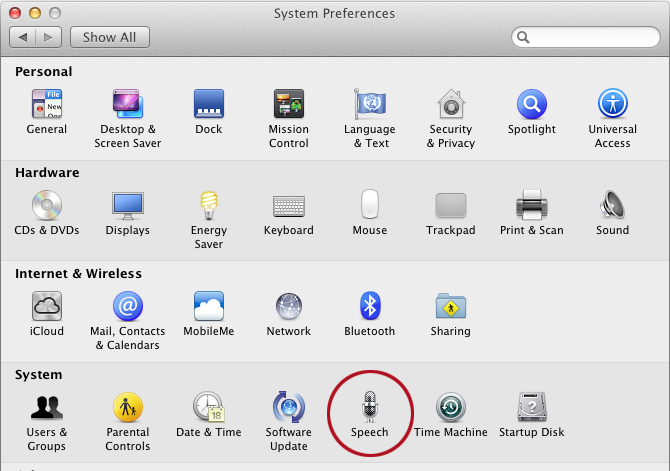
To set up Text to Speech, go to System Preference and select Speech from the System section.
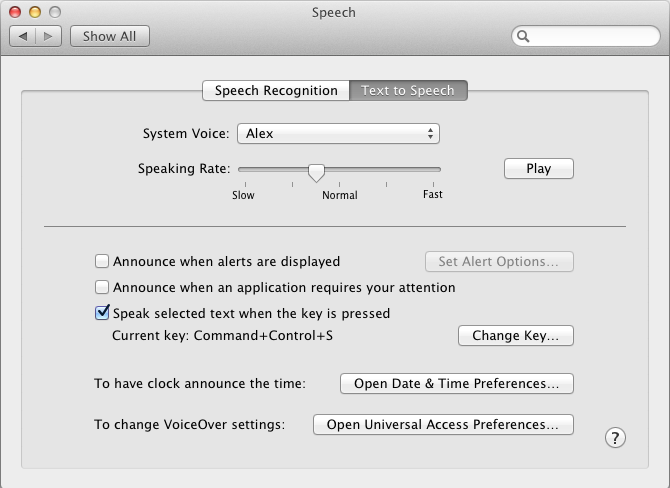
Ignore ‘Speech recognition’ and click on ‘Text to Speech’. Under ‘System Voice’, select ‘Alex’.
‘Speaking Rate’ is a matter of personal taste. If you just want to hear how a big block of text sounds, leave it in the centre. For a more deliberate rate of delivery closer to a video voiceover, I move the slider half-way towards the first notch to the left of centre. For things like radio ads, you might want to push the tempo higher.
Leave the two ‘Announce…’ boxes unchecked, unlesss you want Alex to chivvy you every time you pull a USB stick out without unmounting it.
Check ‘Speak selected text when the key is pressed’ and then choose a key combination that’s (a) easy to remember and (b) not used by any application in which you’d use Text to Speech (i.e. Word or another text editor). You can use modifiers (Command, Shift, Option and Control); personally I use Command+Control+S.
Leave the other preferences untouched and close System Preferences.
Using Text to Speech
You can now type away in Word, select all or part of your text, and press your chosen key combination to hear Alex recite it. To make him stop, just press the same key combination again. It works in Safari too – if you’ve done the setup, select a bit of this post and fire away.
For the full effect, put headphones on and close your eyes, or at least avert your eyes from the screen. That can be difficult, since you’ll probably hear something you want to edit the second Alex opens his digital gob.
Alex does tend to rattle through, but there are ways to hold him back. Within a sentence, you can insert a comma to make him pause. Between sentences, you can use a full stop in a paragraph on its own to make him pause even longer.
When I’m doing a video script, I have each sentence in a paragraph on its own, and full-stop-paragraphs in between when I want longer pauses. Along with the speed setting I mentioned above, this gives the sort of rhythm you’d expect to hear.
Obviously, these tweaks could make your text look weird and/or gramatically incorrect, so you might want to do them in a separate version from the one you send to the client.
The major stumbling block, of course, is the quality of the elocution. Inevitably, Alex can’t get every cadence and emphasis right, so you might still have to use your imagination a bit.
Another problem is the nature of the actual voice. Alex is an American Caucasian male (what else?), so he might not match the voice you’d have chosen for your project. You can download some English voices (Daniel, Emily and Serena, all quite close to RP) and others for different countries, but none has the same high-quality timbre as Alex.
Despite these issues, I still argue that this method is quick, effortless and better than the alternatives.
Making audio files with Text to Speech
If your client is on Mac and reasonably tech-literate, you can send them a link to this post so they can listen to your text in the same way. But a simpler and arguably more professional approach is to send them an audio file of the spoken version.
This involves using Terminal, but don’t worry – it’s dead simple and will give you a gratifying sense of geeky know-how. If you’re as old as me, it may also bring back pleasant memories of using command-line interfaces on trusty old steeds like the ZX Spectrum or RM 380-Z. (Thanks to iClarified for these tips.)
First, make a new document in TextEdit, paste your text in and save it to the desktop as plain text (.txt file).
Then, launch Terminal and enter
cd ~/desktop
followed by Return. Now, enter the following
say -v Alex -o [audiofile].aiff -f “[yourfile].txt”
followed by Return, except with [yourfile] replaced with the name of your file (with quotes around it, note), and [audiofile] replaced with whatever you want your audio file to be called (without quotes around it).
You must get the commands and filenames exactly right, or it won’t work (and you’ll see an error message). If you did get it right, you should see a new AIFF file appear on the desktop. The conversion is silent and much quicker than real-time speech.
AIFF is an uncompressed, ‘high-resolution’ audio format, and its files are usually pretty big, so it’s worth converting your file to something smaller like an MP3 or AAC file.
If you import it into iTunes (just drag the file into the Music Library window) you can use File > Create New Version… > Create AAC version to make an .m4a file that will be much smaller (around 1MB per minute of speech, depending on your settings). This will play on any Mac and (as far as I can tell) on many PCs too.
You can also use a free audio editor like Audacity to open the AIFF directly and then export as an MP3. Use a relatively low-quality setting such as 64kbps to keep the file size down while still achieving acceptable sound quality.
Once you’ve got this audio version, you could even take it into Keynote or PowerPoint to add audio narration to a slideshow and make a rough-and-ready version of a video or ad – although it would probably be simpler to use your own voice for that.
Comments (5)
Comments are closed.
Ace book marking to figure out tomorrow – I love ‘you’ll probably hear something you want to edit the second Alex opens his digital gob.’
Brilliant idea, thank you. Will try later!
Good post, Tom. I didn’t even know text to speech existed. I like your comment about if you don’t have a mac to go and buy one – said like a typical Mac snob. 🙂
Great post, Tom. I’m a firm believer in text to speech: I check all my translations using it. It’s amazing how easy it is is to gloss over tiny mistakes like duplicated words when you read your copy on screen. With t-t-s you can’t help but notice. Did you see what I did there.
I also used to listen to my translations after I finish it, it really helps avoiding mistakes. Although I am not a Mac user myself, I found a great Chrome Extension to do this it’s called Select and Speak:
https://chrome.google.com/webstore/detail/select-and-speak-text-to/gfjopfpjmkcfgjpogepmdjmcnihfpokn?hl=en
I like it because you can start with just one click, no more copy pasting and it supports a lot of languages.
Another tool I used to use is Text to Speech, I think they use the same engine because the voices are the same and they don’t sound robotic at all.
http://www.ispeech.org/text.to.speech